Wednesday, September 24, 2014

Asian Turkey Salad

A few years ago, I had an Asian-style beef dish that a friend had prepared from "Supper Works".  It was quite tasty, so I replicated it at home.  I've switched out the beef for turkey in this recipe, but any lean ground meat would work well with the flavours!


This is a super easy dish to make -- it's quick and would be a forerunner for a busy weeknight dinner!  Here's the step by step:

Warm a heavy pot or large frying pan over medium-high heat and add in 2 onions that have been diced and sautee until golden brown.  I usually add a dash of salt for flavour as well while I am sauteing the onions.  I use my Le Cruset pot so I don't need any added oil, but you may have to give your pan a light mist of oil to fry up the onions. 


Once the onions are translucent, add in 1lb of extra lean ground turkey.


Break it up with a spoon and cook it until it's almost done.


While the turkey is cooking, strain one can of sliced water chestnuts and chop them up into a large dice.  


Add the water chestnuts to the turkey mixture along with 3 tbsp of Hoisin sauce.  You can buy Hoisin sauce, or you can make your own clean version -- like this one or this one.  


Chop up a few green onions and a handful of fresh basil (Thai basil works best if you have that available to you) and add it to the works just before serving.


Easy as that, dinner is ready!  I simply chop up a bed of lettuce and add the Asian Turkey ontop and finish it off with a little more fresh basil!  Yum!!  Enjoy!!


Asian Turkey Salad

Makes 3 - 4 servings

2 onions (about 200 g each), diced
1 tsp salt
1 lb extra lean ground turkey
1 can water chestnuts, chopped
3 tbsp Hoisin sauce
1 bunch of green onions (green part only), chopped
large handful of basil, finely chopped + additional for garnish
1-2 heads of butter lettuce, chopped

1. Over a large skillet or Le Cruset pot on medium-high heat, sautee the onion until translucent.  Add in a pinch of salt or so for added flavour.
2. Add in the ground turkey and break it up with a spoon, while mixing occasionally
3. When the turkey is almost done, add in the water chesnuts and Hoisin sauce and heat through until the turkey is finished cooking
4. Before serving, stir in the green onion and basil.
5. Chop up the lettuce and arrange on dinner plates
6. Top each plate of lettuce with the Asian turkey and garish with some additional basil.


Tuesday, September 23, 2014

Pumpkin Pie Oatmeal

Fall is here and this is the perfect fall recipe!  The other morning I had run out of blueberries for my normal bowl of oatmeal; however, I had a can of pumpkin sitting on my counter waiting to be turned into pumpkin muffins.  The wheels started turning and it hit me, why not make pumpkin spiced oatmeal?!  Well, this is now my new favorite breakfast -- and super easy to make!  


In addition to rolled oats, you will need pumpkin, egg whites, coconut sugar, nutmeg, cinnamon, ginger and vanilla.


I use regular rolled oats (not the quick cooking kind).  I bring 2 cups of water to a boil and then add in 2/3 cup of rolled oats.  Stir them occasionally as they cook.  While the oats cook, I prep my ingredients:  Measure out 2/3 cup of pumpkin, 1 cup of egg whites, 1 tbsp coconut sugar, 1/4 tsp cinnamon, 1/8 tsp ground ginger, 1/8 tsp all-spice, and 1/8 tsp ground nutmeg. 


When the oats are done to your desired consistency, and most of the water is gone, stir in the egg whites.


To avoid any egg white "chunks", I vigorously stir the oats, while slowly pouring in the egg whites.


What you are left with is a creamy looking oatmeal.


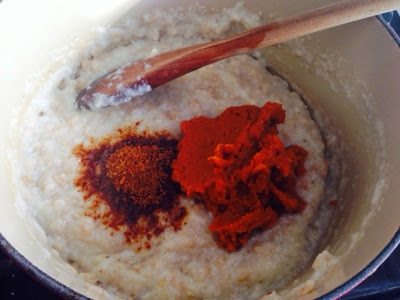
One the egg whites are combined into the oats, add in the pumpkin, sugar, spices and 1-2 tsp of pure vanilla.


Stir the mixture over a medium-low heat for a few minutes to allow the flavours to meld together.


Portion out into two bowls, and enjoy -- I like mine with a nice latte made with my homemade almond-hazelnut milk!   Yum!!


Pumpkin Pie Oatmeal

Serves 2

2 cups water
2/3 cup rolled oats
1 cup egg whites
2/3 cup pumpkin puree
1 tbsp coconut sugar
1/4 tsp cinnamon
1/8 tsp ground ginger
1/8 tsp ground all-spice
1/8 tsp ground nutmeg
1-2 tsp pure vanilla

Bring water to a boil and add in the oats.  Stir occasionally over medium-high heat until the oats are cooked.  While stirring vigorously, slowly pour in the egg whites to get a creamy consistency to the oatmeal.  Add in the remainder of the ingredients and stir over medium-low heat for a few minutes.  Serve and enjoy!


Sunday, September 21, 2014

Almond Hazelnut Milk -- two step filtration process

I've started to make my own nut milk!  I thought the process would be too time consuming, so I held on to buying the carton type -- well, so glad I finally tried making my own! It is so easy and tastes so good!

I tried making pure almond milk during my first attempt.  It was OK, but I've never been a huge fan of almond milk in my coffee.  Then it came to me, I love hazelnut coffee, so why no try an almond-hazelnut milk!  It's so good, and one of my new favorite nut milks!  The first nut milk I made was also a bit "gritty".  After trying a number of different methods, I have decided that is one is my favorite and works great every time!


First, measure out your nuts.  I use 1:1 almond to hazelnuts (1/2 cup of each).


It is important to soak your nuts -- I put them into a ziploc container filled with water, and let them sit in the fridge overnight.  You could also soak them on the counter for about 4-5 hours.


After the nuts have soaked, the water they were in will be quite dirty looking -- drain that water and give the nuts a quick rinse.


Place the nuts into a high-powered blender with water.  You will need a 4:1 ratio of water to nuts -- so if you use 1 cup of nuts, add in 4 cups of fresh water.


Blend the nuts and water on high for about 2 minutes.


Now comes the fun part -- straining the works.  I place a nut milk bag over a pitcher, then pour the milk mixture into it.


Leave the nut milk bag to hang for a while to let the milk seep out. Do not squeeze the bag to get more milk -- I find it changes the flavour of the milk you get, and not for the better.


This used to be where I finished my nut milk making process, but I didn't like the sediment that would come with the nut milk....


Here is my ingenious idea to get rid of the sediment!  A super-fine coffee filter!  You can buy these reuseable coffee filter baskets at most hardware stores.


Place the filter onto a sieve that is overtop of a measuring cup or pitcher and pour the nut milk into it.


I was amazed at all the fine sediment it was able to extract!


Voila!  What you are left with is super creamy nut milk with no yucky grittiness or sediment!!


It can be used as-is, or add a splash of vanilla to the works before pouring into a jar for storage!


The nut milk for last for a few days in the fridge.  It makes the most amazing latte -- smooth, creamy and delicious!!

Enjoy!!